I started painting (using watercolour) in 2004 at the grand old age of 46 :-) and although I was pretty darned pathetic at it, I persevered until I became slightly less pathetic! And when I won a
1st Place Trophy at a local painting exhibition, I was locked into the hobby good and proper!
After a while I switched to oils and then acrylics, but never really had much success - needless to say, I'm my own worse critic. Then a found a blog called
120 PAINTINGS by Jim Mahorney and he taught me to accept my failings, learn from them and move on. So that's exactly what I did. I started this blog with the intention of producing 86, 8x6-inch quick paintings and post every single one, good or bad. I started out with the intention of doing a 'painting a day' in order to learn quickly, but that didn't quite work out for me.
Over time, I got slightly better at all three mediums but being an expert procrastinator, I always found reasons not to paint and most of the reasons were based on the fact that it was a bit messy or I didn't have enough room or my wife wanted me to be with her, etc, etc.
The biggest excuse for not starting to paint though, was that I am not a natural drawer. Sure, I can sketch roughly and can get
something down on paper, but if I wanted to commit to a bigger painting, I found the drawing aspect to be a real challenge - and was usually very reluctant to even start! I always had three battles on my hands (in addition to preparing an area to paint in and setting up an easel and laying out the paints, brushes, mediums, cloths, etc)...
1) Stop staring at the blank canvas and sketch!
2) Start applying paint!
3) Finish the painting!
As much as I wanted to paint (and I always
wanted to), I found it to be a bit of a chore. That is until I found Digital Painting. I had an 8"
Samsung Galaxy Tab tablet and just out of curiosity, downloaded a painting app called ArtRage. Soon enough I was producing small sketches using my finger and then later using a passive stylus. These sketches were extremely basic and I pretty much gave up on the idea until I bought my wife a 10"
Samsung TAB-S with built in
active pressure-sensitive stylus.
The TAB-S was a bit of a revelation. That stylus made
all the difference to the digital painting experience! The screen too was dramatically better than my older tablet and ArtRage was a dream to work with. My wife started to quickly produce some good work on the TAB-S and I was showing more and more interest in it.
Soon after I invested in a new iPad Pro 12.9 (2nd Generation) with an Apple Pencil. This bad boy was
big and
professional and used by many established artists, so surely this would make me a great painter, yes?? Well no, actually. But it did give me a great high-resolution screen with the ability to work on larger canvases than the TAB-S. The Apple Pencil was obviously pressure-sensitive and even the lean-angle of the pencil was detected. All good - so I started to search Amazon for an
ArtRage For Idiots book, but there was none. In fact there were no guide books on ArtRage at all which was a bit of a disappointment, but thankfully, there were plenty of Video Tutorials on YouTube.
COPY & TRACING
When starting out learning to paint, many people set off on their journey by copying what other artists have done. I was no different. I would find paintings on the internet which really inspired me and then 'have a go' at them. Now there's a hell of a lot of people who will tell you that this is a
bad thing to do, insisting that you find your own style. Well that's fine for them, but I didn't
have any style of my own (see my tailor), so I had to develop one by studying other people's work.
By copying the work of other artists, I believe that you can learn a lot in a short space of time. Especially if you
vary the styles you are copying. Soon enough, you will find that you have to study less and that you make your marks on the canvas without referencing the source image.
As mentioned previously, I am not a natural drawer, so I tend to use whatever tools are available to me in order to get a decent outline sketch onto the canvas. The old Masters used the "
Squaring Up" method and some even used a form of projection in order to get that all important perspective right. Some used
tracing paper - yes as far back as the early 1800's.
Fortunately, ArtRage has a tracing tool built in, which allows you to superimpose an image onto your canvas so that you can accurately sketch an outline. Once you're done, you switch it off and you're left with a decent sketch on which to build your painting.
Is tracing an outline cheating? Well it certainly feels like it! Despite the knowledge that the 'Old Masters' traced in one form of another, I would feel much better about myself if I didn't need to do it! And the fact is, I often
don't need to do it - especially if it's a landscape scene. But sometimes, the scene you want to paint is extremely complex - so much so, that you decide not to even bother!
A good example of this would be my decision to paint my all-time favourite camera. I had already painted cameras on small canvas panels using my own hand drawn outlines, but they were very impressionistic and didn't need lots of detail. I was happy with the outcome...
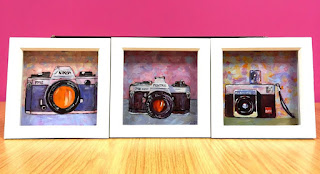 |
| Hand-Drawn Oil Sketches |
But when it came to doing a more detailed painting, it was essential that I got the perspective and detailing right. I needed the buttons to be in just the right location. I needed to make sure that the multiple rings around the lens were going to be inline. A little bit like making sure that the eyes of a person are in exactly the right part of the face.
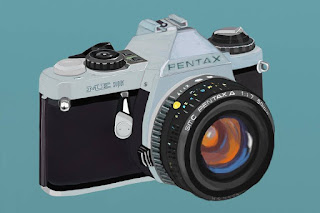 |
| Traced-Outline Digital Painting |
When it comes to tracing, I personally make
as few marks as possible - just enough to help me get the overall proportions right. Sometimes, I do nothing more than draw
dots to indicate the width of height or position of something. I guess it's up to you to decide what you feel comfortable with.
Anyway, the fact is, ArtRage has the facility to aid you in your initial sketch, and as far as I'm concerned, that's a good thing! Use it or don't use it. It's not cheating - it's just another artists' tool.
So with that out of the way, let's move onto the actual painting bit. Having a sketch onscreen is just the first step. There's a hell of a lot do do from there! And it's not easy -
far from it. Getting familiar with the virtual tools needs practise and patience. Repetition is the best tutor, I've found. The more you play around with ArtRage, the better.
And don't try to produce a winner from the get go. It's not going to happen. Start off by drawing simple objects and learn how to shade them. Maybe work in Monochrome to start off with. Go through the various tools one at a time and get familiar with it just by doodling.
Do some
unimportant sketches using the pencil tool and then switch to the marker pen and then the airbrush, etc. Don't rush from one thing to another though - stick with one tool until you understand how it works in its basic form and then how all the
settings effect it. You can alter things like size, opactity, pressure and a lot more.
Only move on to a new tool when you really feel comfortable with the previous one. This part of the learning curve is really important and although you will probably feel eager to try
everything, resist the temptation if you can.
One of the best tips I can give you is to
USE LAYERS!!! I kept saying this to my wife and she kept resisting. And then eventually, it clicked with her and she just can't do without them now.
When you open up your new blank canvas and start to draw on it, you've actually created a layer - it's the background layer. If you carry on painting on top of your sketch (as you would in a normal painting scenario), you would lose your sketch under the paint. But with ArtRage (and most other painting apps) you can create a new
layer over your background layer and although it looks like your sketch has been lost to the paint, it can easily be brought to the top of the painting. OR you can use your sketch-marks as guidelines for your painting and then delete the sketch layer completely to hide those marks from your work.
The fact is, the more layers you have, the better. You can work on your piece without causing damage to the underpainting. Think of it as a non-destructive glazing technique - at least!
There's lots of painting/sketching tools in ArtRage and they are all displayed on the left side of your screen. This tool-palette can be shrunk away when you want to declutter the screen, as can the paint-palette.
When you make a wrong move, it 's easy to hit the undo-button (multiple times if required) or you can click on the Eraser and go rubbing out. Thankfully, you can also have a "
Reference Image" up in the corner and it's even resizeable...
Another tip for beginners - think about print sizes!! It's all too easy to start painting and find that your wonderful creation is a really odd shape and you'll have to have a custom-frame made for your print. Start every painting (unless you don't care about custom-frame costs) with a particular format in mind.
Needless to say, the most flexible format is Square! You can print the resulting painting to whatever size square frame you fancy - 8x8, 10x10, 16x16, etc, etc.
If you are opting for a rectangular format (portrait
or landscape), then choose a suitable size. For example, if you were thinking of an 8x6" print, then you need to create a canvas size in the 4:3 ratio, say 4000 pixels wide and 3000 pixels high.
Bear in mind that the higher the pixels, the higher the resolution of the image. Higher resolution means more options to print big! If you chose (for example) a canvas size of 400 x 300 pixels, then you would only be able to make a very small print of your work before it became pixelated.
But bear in mind too, that any brush size will be smaller onscreen (and canvas) the higher the resolution you choose. Conversely, a brush mark will seem huge when you use a very small canvas.
If you have no intention of printing big and just want to produce paintings for your own enjoyment on your Tablet/PC, then don't worry about it.
So there you go - Digital is fun and relatively easy. I say easy because whatever you do wrong, you can undo at the touch of a button and have another go at it. There's a
lot to learn and it will never replace tradtional painting in oils or watercolour,
but it's an alternative and best of all, it can be done
anywhere - even on that long flight to your holiday destination.
And it's a
fantastic sketchbook too! ArtRage makes it so easy to take a photo of your chosen scene and sit down to create a wonderful painting from it. Give it a go!


